Experiment No.: 5
Experiment Name:
Set up the Solar PV Plant to Produce Electricity.
Objective:
To set up the Solar PV Plant to produce electricity.
Procedure:
Step 1: Gather solar power components
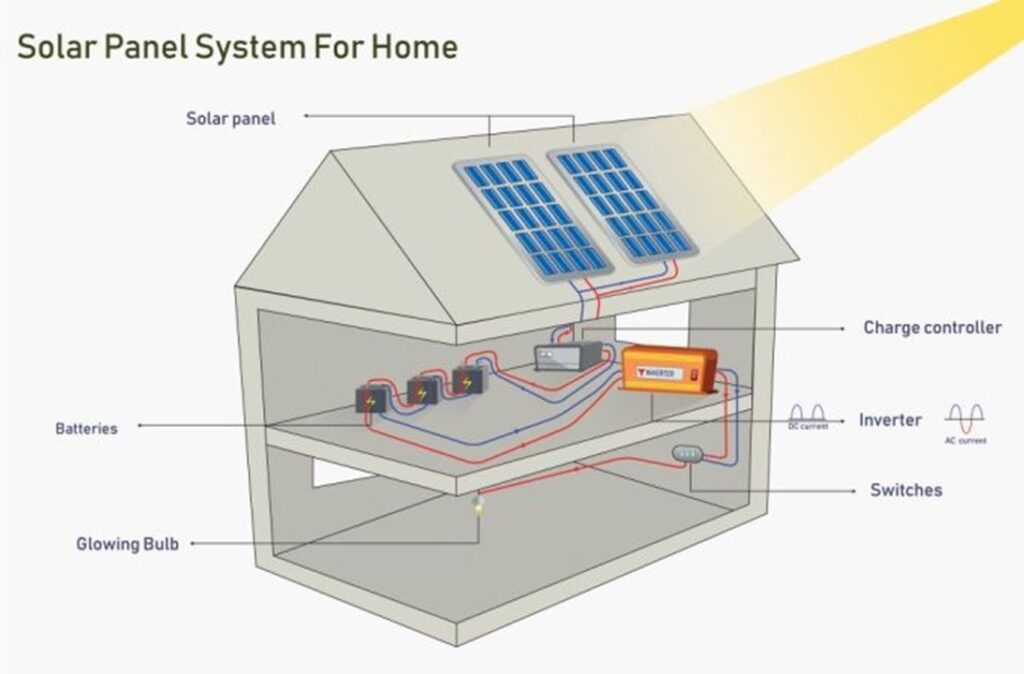
It all begins with gathering the basic ingredients of a solar power unit. You will need four major items – solar panels, charge controller unit (CCU), inverter, and a battery pack. In addition to these items, you will require a breaker, meter, MC4 connectors, and fuses among other things. Keep in mind that it is essential to read the solar panel module instructions.
Step 2: Calculate your power load

Before getting to the solar installation task, it is crucial to sum up the power that you use at your home. All you have to do is to note down the home appliances that you use on a daily basis, which include television, lights, fan, and so on. Next, add the time for which these appliances run in a day. Go through the specification chart in your household electric appliances to check their usage duration or run time, and their power rating.
Now calculate the ‘Watt-Hour’ by multiplying the runtime of an appliance with its power rating. Follow this step for each electrical device, then sum up the individual watt-hour numbers to get the grand total. You can also simplify this calculation by using an online off-grid load calculator.
Step 3: Select and charge the battery

A major problem with solar power is that it doesn’t provide electricity when the sun goes down. However, you can easily crack this problem by using a battery. A lead-acid or a lithium-ion battery stores solar power generated during the daytime and discharges it at night. This provides a steady supply of energy, provided you have selected the optimum battery storage capacity. You will need a power controller to monitor your battery’s charging. These come between the panels and the battery. Such controllers are typically fitted with a small LED light that announces the charging state of the battery, and it adjusts the power that flows into the battery.
Step 4: Set up the inverter

Solar arrays produce electricity in direct current (DC), but electrical appliances use power in the form of alternating current (AC). Inverter is a device that saves the day by allowing you to use electrical devices without using adaptors. Inverters come in varying power wattages and types including square wave, modified sine-wave, and pure sine-wave inverters. Square waves are not compatible for all devices, while the output of modified sine wave is not suitable for certain appliances such as a fridge. This makes a pure sine wave inverter the best choice for your solar system.
Step 5: Fix the solar panels on your roof

Once the battery, controller, and inverters are ready, you need to get started with mounting the solar panels. Select the best spot for the panels on the roof or on open ground that receives an unhindered supply of the sun’s radiation. You can either make a mounting stand yourself or get it from the market. The tilt of the mounting stand should almost be equal to the latitude angle of your location. The proper setting of the solar panels is critical for their operation & maintenance. Hence, it is essential to ensure that the panels face the sun throughout the day.
In the last phase of this step, wire the solar panels. You can trace a small junction box at the back of the solar panel. The junction box has negative and positive signs of polarity. In a large sized-panel, the junction box has terminal wires too with an MC4 connector. However, you will have to align the junction box with external wires yourself if you use small solar panels. Use the black and red wire for negative and positive terminal connections, respectively.
Step 6: Connect the solar panels with battery
You need to connect the solar panels with the battery. In certain PV systems, these come paired together, so you don’t have to put in the additional effort. In cases that are not given as a single unit, you need to make series and parallel connections. You can make a series connection by connecting a device’s positive terminal with another device’s negative terminal. For a parallel connection, you need to connect one device’s negative terminal with another device’s negative terminal and so on.
Step 7: Setup stands for inverter and battery

Your residential solar unit is incomplete without stands for the battery and inverter. Again, you have the option of building the stands or getting them. Once the allocated positions for the inverter and battery are ready, you can start working on the wiring. Start with wiring the controller. The first connection from the left is for connecting the controller with the solar panels. The second connection is for pairing the battery with the controller. The last connection is for connecting the controller to the direct DC load connection.
For connecting the solar panel with the charge controller, you will need a separate connector called an MC4 connector. Once the controller is connected to the battery, its LED lights should light up. Similarly, you will have to connect the inverter terminal with the battery’s terminal.
Following these steps can guide you to set up a solar power unit at your home. The high costs incurred in installing one can be reaped later on as solar energy is not only clean but also a cost-effective investment.
Set up of Home based Solar PV Plant:

Outdoor Solar PV Plant:

Views: 794